When transcribing using many channels, the program window can become quite large. This can especially be a problem when using Windows machines, which tend to have smaller monitors. Here are some tips for reducing wasted space.
If you right-click on the segmentation bars or the waveform display, a pop-up menu comes up. Go to the Display submenu. In the bottom part of it, there is a list naming the segmentation bars, ending with seg0_default, seg1, seg2, and bg. Next to each name is a checkbox and if the checkbox is not selected the segmentation bar is not displayed.
The easiest way to save space is to turn off the display of bg, seg2, and seg1. These correspond to the top three segmentation bars colored tan, red and blue (the Background, Section, and Turn segmentation levels), which are not supported in our multi-channel version of Transcriber. After you do this, selecting Options/"Save configuration" from the pull-down menu will save the change for future sessions.
The segmentation bar names that start with seg0_ refer to the green segmentation bars, with the part after the underscore identifying the channel. If you were pressed for screen space, you could turn these on and off during your work depending on what channels you were actively transcribing.
Also, the "Reduce waveform" command in that Display submenu can be used to shrink the waveform display (and the "Expand waveform" command will restore it).
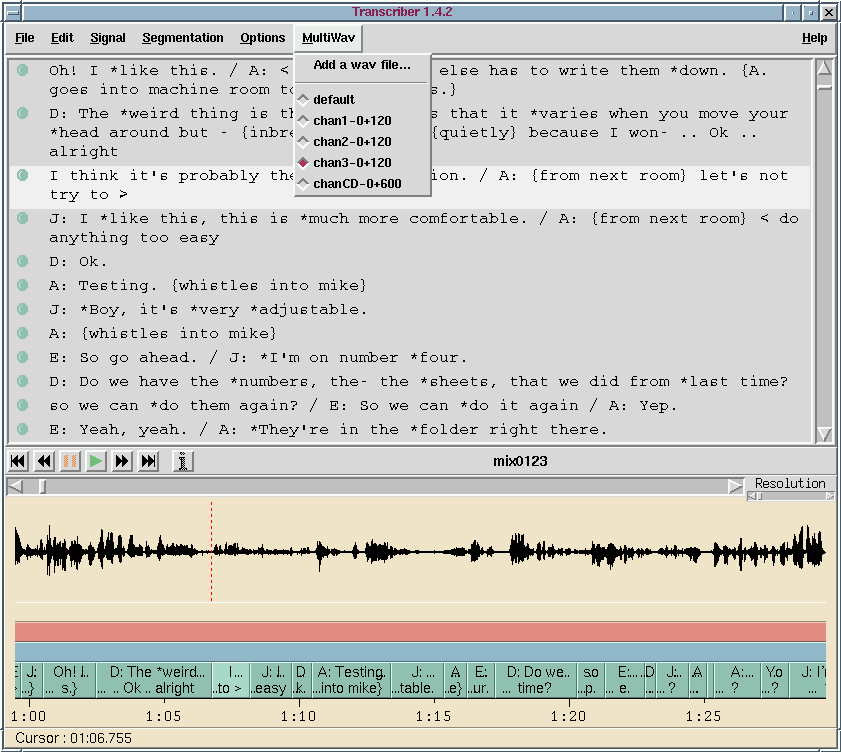
While the MultiWav menu allows switching audio playback between files, the waveform display will always show the file loaded through the File menu's "Open audio file..." command. If you use the File/"Open audio file..." command to load another audio file, the waveform display will change to show the new audio file. (Incidentally, selecting the "display" entry in the MultiWav menu will cause audio playback to come from the currently displayed file--in other words, whatever file was last loaded with File/"Open audio file...".)
When the new audio file is first loaded, you may have to wait for the "Currently computing global shape..." dialog to finish. But after that, you can use the File/"Open audio file..." command to switch back and forth between displaying the two audio files without a delay. This assumes that "compute low-resolution shape for long sound files" is enabled in the Options/"Audio file..." dialog. If it is disabled, you can load new files without a delay but your ability to zoom out in the waveform display will be limited (but we haven't found this limitation to be a problem for transcription). By the way, if "compute low-resolution shape" is enabled the software will create files containing the shape data. These have the same base filename as the audio files with the filename suffix changed to ".shp", and by default they are created in /var/tmp. If you make use of audio files with the same filename (in different directories), the software may get confused and load the wrong shape file (since the shape files are identified only by the filename of the audio file, not by the directory it came from).
If you have loaded all the channel audio files into the MultiWav menu, then holding down the Control key and clicking on a segment in a green segmentation bar with the rightmost mouse button will play the segment using the audio file corresponding to that channel. The audio file is chosen based on the order of files in the MultiWav menu. (Skipping the "display" file in the MultiWav menu which is always there.)
So if, you want to have control-right-click on the default channel play from the file mix.wav, control-right-click on channel 0 play from the file bob.wav, and control-right-click on channel 1 play from the file sally.wav, then use "Add a wav file..." in the MultiWav menu three times to add mix.wav, bob.wav, and sally.wav in that order. The MultiWav menu will then list "display", "mix.wav", "bob.wav", and "sally.wav". To help you check that this is working correctly, while audio is playing the word "Audio: " and then the name of the audio file being used will appear in the status line underneath the segmentation bars (e.g., "Audio: mix.wav").
If there are less audio files than channels then the "display" file in the MultiWav menu will be used for the remaining channels. The "display" file in the MultiWav menu always references the audio file being displayed in the waveform view.
Using this Control-Button-3 feature does not change the currently selected audio file in the MultiWav menu (which is used for all other modes of audio playback).
A nice feature of Transcriber is that a personal configuration file .transcriber is created in a user's home directory once the Save Configuration command is used. The new "height,sync" parameter in the configuration file sets the height of the green segmentation bars. If the height,sync line in .transcriber is uncommented and height,sync is set to 2, the bars double in height as shown in the first screenshot on the previous page. The larger bars can be more convenient, since they can display more text. But, if many channels are being used the larger bars take up too much space. For this reason height,sync is set to 1 in the default configuration.
The cursor is the red vertical dotted line in the waveform view. When the user clicks on a new segment, the cursor position moves to the start of the new segment. And if the new segment is wider than the time range shown in the waveform view, then the waveform view moves to show the middle of the new segment. For example, if the cursor is at 5.566 seconds, and the user clicks on a new segment that starts at 16.119 s and ends at 1:00.52, then the cursor will move to 16.119 s and the waveform view will move so that the center of the new segment (38.32 s) is at the center of the waveform view.
This can be annoying, since sometimes the user would prefer that the waveform view did not change. Moving the waveform view back using the scrollbars can be slow. Here's a quick way to restore the situation. Left-clicking on the status line (the bottom row in the Transcriber window, below the green segmentation bars) will bring up a window titled Cursor which allows you to type in a new cursor position in seconds or hours:minutes:seconds formats. The waveform view will automatically move to contain the new cursor position (so even re-entering the current cursor position should work).
If the cursor position has not moved much from where it used to be, then there is a quicker way to move the waveform view back. The Play Around Cursor command in the Signal menu (hotkey Alt-Space) has the side effect of moving the waveform view so that it contains the current cursor position.
Back to ICSI Meeting Recorder homepage